So now you understand a certain programming language and coffee is your new best friend. But everywhere there is code, you see Git. They say a true developer must know Git and here you are, knowing nothing about Git, but longing to getting started.
I have to admit, Git is as complex as it is popular. However, you don’t need to know all the 160+ commands of Git to do daily operations. Here is a short but comprehensive tutorial that will teach you the most used features of this world-famous version control system.
What is a Version Control System?
A Version Control System (VCS) is a system that track and manages changes to files. A project with a VCS is usually called a repository or repo for short.
A VCS allows you to have multiple versions of a project. To visualize the need for a VCS, imagine you are working on a new feature in a project, and a bug that needs to be fixed immediately is reported. With a VCS, you can easily create a new version of your repository, fix the bug, then return to the previous version when you are done fixing the bug. You can also see the different changes you’ve made in your repository over time and can easily rollback when a change is undesired or introduced a bug. If you also modify your files or lose them, you can restore your repository to the last saved snapshot.
What is Git?
Git is a version control system that manages a collection of files in a certain directory. Git is a Distributed Version Control System. This means Git does not rely on a central server to store all the versions of a project’s files. Instead, every person “clones” a copy of a repository and get all the history and branches (more on that later) of the project. Although the original source code of a repository may be stored on a third-party hosting service like Github, any person can have their own copy of the project.
Git was created by Linus Torvalds in 2005 for development of the Linux kernel, with other kernel developers contributing to its initial development.
Installation
Note: You’ll need to be able to work with the command line fluently before learning Git. Even though there are Git GUIs, Git itself is a command line application. If you don’t understand the arts of the command line yet, you can check Tania’s command line tutorial.
You can download Git for macOS, Windows, Linux or build it from source from the Official Git website.
When you are finished installing, you can check if git is installed by running the following code in your Terminal (or Command Prompt for windows).
git --versionIf you see a result like the following, you are good to go.
git version 2.30.2.windows.1Configuring Git
After you install Git, you will have to set some configurations. These include your name and email and are used to mark changes that you introduce in a repository. That way, people can see changes you made and contact you easi;y.
git config --global user.name "Firstname Lastname"
git config --global user.email [email protected]
The above commands tell Git your names and email. Remember to change Firstname Lastname and [email protected] to your own names and email respectively.
You can type the following command to check the saved config:
git config --listAnd you may get results similar to this:
color.ui=auto
core.editor='C:\Program Files\Sublime Text 3\subl.exe' -w
core.symlinks=true
core.eol=lf
[email protected]
user.name=Firstname Lastname
Git workflow
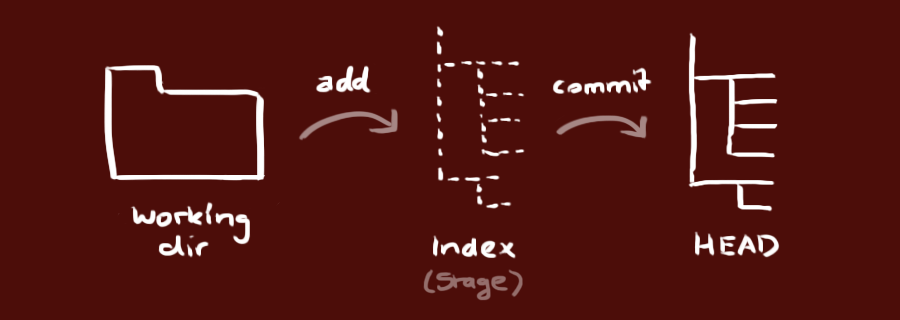
Any git repository consists of 3 “trees” maintained by Git:
- Working Directory: This is your folder with the actual files, the one you can see in File Explorer.
- Index: This is a staging area where Git put files that you are going to commit soon. (i.e. changes that are going to be marked as a new version.) This is because there are certain files that you may want to mark as finished and won’t change, while there are others you are still working on and don’t want to be released in this version.
- HEAD: This is a reference that points to the last commit you’ve made.
So you add files from the Working directory to the Index. As you work further, you can add more files to the Index or even remove (restore) files from the Index. When you are ready, you commit your changes. This will next generate a commit and a new HEAD that points to your last commit.
Working with repositories
In this tutorial, we will need a new blank directory to learn Git and follow along. You can create a new folder anywhere to start experimenting with Git. I created mine at D:\project.
Initializing a Git repository
By Initializing a Git repository, you convert an unversioned project to Git or as in our case, create a new empty repository. (Yep, you can now call your project a repository!) You will need to run the rest of the commands in the root of the project. You can type cd to see where you are now and check if it is indeed where you are planning to create a new repository.
git initAfter initializing your git repository, you should see a message like: “Initialized empty Git repository in C:/project/.git/” to confirm that a new repo has been created successfully. Note that Git create a hidden folder called .git to store version and history data.
Tracking files
You will now need to create two files at the root of your project folder: index.html and style.css. You can use your favorite text editor (I ❤ Sublime Text) to save them to the root of your repository.
Checking the status of a repository
You can check the status of your local repository by using the git status command. You will use this command a lot while working with Git repositories.
git statusOutput:
On branch main

No commits yet

Untracked files:
  (use "git add <file>..." to include in what will be committed)
        index.html
        style.css

nothing added to commit but untracked files present (use "git add" to track)
Note: On some older versions of Git, the
mainbranch may be calledmasterby default, this is normal. To change the name of the master branch to main, run:git checkout masterthengit branch -M main
Staging files
The output above tells us that Git knows there are new files in the Working Directory but they are not tracked (They are not part of our Git repo; Git is not tracking changes to them, yet). We have to stage the files using the git add command.
git add .Adding/Staging the files put them to Git’s Index.
The
.(or*) tells git to add EVERYTHING to the repo.You can also add a single file to the index at a time by using the
git add <filename>syntax.git add index.htmlwould add index.html only.You could also add a range of files using the
*(wildcard character).git add hello/*would add all files in the hello folder.
Committing changes
Let’s check the status again with git status.
On branch main

No commits yet

Changes to be committed:
  (use "git rm --cached <file>..." to unstage)
        new file:   index.html
        new file:   style.css
We are now ready to commit the files (i.e. mark the changes we made a version).
git commit -m "Initial Commit"Output:
[main (root-commit) 154dcd7] Initial Commit
 2 files changed, 2 insertions(+)
 create mode 100644 index.html
 create mode 100644 style.css
While committing, the option -m can be used to provide a commit message, in this case “Initial Commit”. You are encouraged to always provide a descriptive commit message that show a gist of the changes you’ve made.
If you don’t provide a commit message, Git will use the default editor, set in the installation process on Windows or otherwise Vim, which could be weird for users who don’t know to use Vim because it shows a strange screen where you can no longer enter any commands. To quit Vim, press ESC and type
:q!followed by ENTER. You can learn how to configure Git to use your favorite text editor.
Branches
Branches are used to develop features isolated from each other. The main branch (or master, depending on the version of Git) is the “default” branch when you create a repository. Use other branches for development and merge them back to the main branch upon completion.
Creating a new branch
In this project, we will be creating a new branch to add javascript.
You use the git chekout -b <branch-name> syntax to add a new branch.
git checkout -b javascriptSwitched to a new branch 'javascript'Listing all branches
You can use the git branch command to list all branches in the current repository.
git branch* javascript
main
The current branch is highlighted in green and an asterisk is shown before it’s name.
We can starting working on code in our new branch. Create a file called script.js. We can the use git status to view the state of our repo.
git statusOn branch javascript
Untracked files:
(use "git add <file>..." to include in what will be committed)
script.js
nothing added to commit but untracked files present (use "git add" to track)
Notice that the output shows that we’re on branch javascript and that script.js is untracked. We will need to add it to the
Index.
git add .Then commit.
git commit -m "Add script"[javascript 355fad9] Add script
1 file changed, 1 insertion(+)
create mode 100644 script.js
Reviewing and Merging
When you are done implementing a feature in a branch, the only thing left is to merge it to the main branch. Merging is Git’s way of taking a forked history (an independent line of that divergd from the current branch) and incorporating it the current branch. Merging allows you to “combine” different versions of code that diverged from a shared branch. We are going to merge code from the javascript branch back into the main branch.
We’ll need to go back to the main branch first.
git checkout maingit diff
It is good practise to first review changes before merging or committing. You can use the git diff command (short for difference) to show changes between different revisions or paths. (You can use it to compare branches, commits and whatnots).
If you provide only one argument, Git shows the changes in your working tree relative to the named reference. You can use HEAD to compare it to the latest commit, or a branch name to compare it to the tip of a different branch, which is what we’ll do here.
git diff javascriptdiff --git a/script.js b/script.js
new file mode 100644
index 0000000..d7ac302
--- /dev/null
+++ b/script.js
@@ -0,0 +1 @@
git merge
After now reviewing the changes we are about to merge, it’s time we merge the actual changes back into the main branch.
git merge javascriptUpdating 154dcd7..355fad9
Fast-forward
script.js | 1 +
1 file changed, 1 insertion(+)
create mode 100644 script.js
After the branch is merged successfully, we can now delete the javascript branch because it is no longer needed.
git branch -d javascriptGit tries to auto-merge changes. Unfortunately, this is not always possible and results in conflicts. You are responsible to merge those conflicts manually by editing the files shown by git. After changing, you need to mark them as merged with
git add <filename>before merging changes.
Logging
You can type git log see the repository’s history and confirm that the branch has been merged.
commit 355fad97c2d442bb4a307385bfd6bac2198e825d (HEAD -> main)
Author: Firstname Lastname <[email protected]>
Date:   Sun Aug 1 15:35:31 2021 +0200

    Add script

commit 154dcd7ce38589eb903346f6996e810401fa4910
Author: Firstname Lastname <[email protected]>
Date:   Sun Aug 1 15:07:37 2021 +0200

    Initial Commit
Because git feeds git log results to a pager, you may need to press q when the log is too long.
You can add a lot of parameters to make the log look like what you want. Here are a few examples:
- To see only the commits of a certain author:
git log --author=alice - To see a very compressed log where each commit is one line:
git log --pretty=oneline - Or maybe you want to see an ASCII art tree of all the branches, decorated with the names of tags and branches:
git log --graph --oneline --decorate --all - See only which files have changed:
git log --name-status
These are just a few of the possible parameters you can use. For more, see git log --help
Tags
When you are done and ready to mark a version of your code, you can add a git tag.
git tag v1.0.0The End
You are now mostly ready to contribute to projects while using Git to track your projects. Although you must note that this is only a basic tutorial of Git and you still have more to learn namely working with remotes. Git is a very complex software and has more than 160 commands but it’s amazing how you don’t have to know even a half to contribute to open source projects and track your project’s progress. You’ll know more git commands naturally as you become more experienced with Git and when the need for them comes.